

How to Set Up a Wi-Fi Extender in 5 Minutes (Any Brand)
 BeatrizNovember 17, 20265 Mins read16
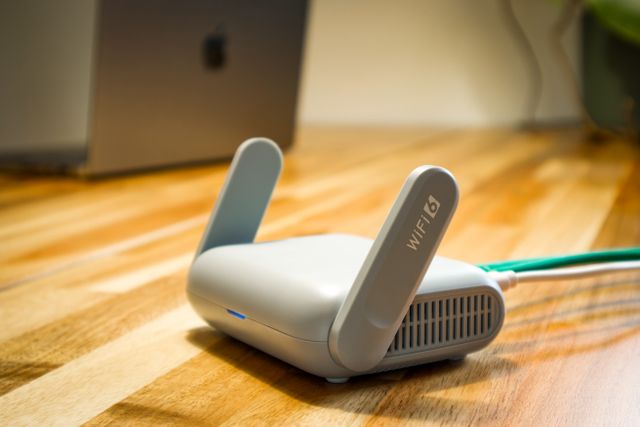
A weak Wi-Fi signal can make simple tasks frustrating. You may struggle to watch videos, join online meetings, or browse the internet in certain rooms. A Wi-Fi extender can help by receiving your router’s signal and sending it farther into your home.
Learning how to set up Wi-Fi extender devices is usually simple. Most models support a quick WPS connection or a manual setup through a web browser. This guide explains both methods for TP-Link, NETGEAR, and other popular brands.
Before You Start: Where to Plug It in First
Before learning how to connect Wi-Fi extender devices, choose the right place for the first setup.
Plug the extender into a power outlet in the same room as your router. This keeps it close enough to receive a strong signal during installation.
Do not place it in the room where Wi-Fi is already weak. The extender needs a working connection to the router before it can extend the signal.
You should also have:
- Your router’s Wi-Fi name and password.
- A phone, tablet, or computer.
- A working power outlet near the router.
- The extender’s setup instructions.
If the extender has an operating mode switch, select Extender or Repeater mode.
Method 1: How to Connect a Wi-Fi Extender Using the WPS Button
Fastest method
WPS stands for Wi-Fi Protected Setup. It allows two compatible devices to connect without manually entering the Wi-Fi password.
This method works when both your router and extender support WPS. Follow these steps:
- Plug the extender into a power outlet near your router.
- Turn it on and wait for the power light to become steady.
- Find the WPS button on your router.
- Press the router’s WPS button.
- Within two minutes, press the WPS button on your extender.
- Wait for the extender’s connection light to become steady.
The exact light color depends on the brand and model. Check your device manual to understand what each light means.
Once connected, the extender should receive your router’s Wi-Fi settings. Some models use the original network name, while others add _EXT to it.
You can now move the extender to a better location.
Important: Some routers have WPS disabled or do not support it. If the connection fails, use the browser method below. WPS is also less secure than manually configuring a strong network password, so turn it off on your router if you do not need it.
Method 2: How to Set Up a Wi-Fi Extender Without WPS
If your router does not have a WPS button, you can connect the extender manually. This method also gives you more control over the network settings.
Follow these steps:
- Plug the extender into a power outlet near your router.
- Wait for the power light to become steady.
- Open the Wi-Fi settings on your phone or computer.
- Connect to the extender’s setup network. It may appear as TP-Link Extender or NETGEAR_EXT.
- Open a web browser such as Chrome, Firefox, or Edge.
- Enter the extender’s setup address in the address bar.
The correct address depends on your brand and model.
| Brand | Common setup address |
| TP-Link | tplinkrepeater.net |
| NETGEAR | mywifiext.net |
| NETGEAR (some models) | 192.168.1.250 |
For TP-Link, some models also use 192.168.0.254. Always check the label or manual for your exact model.
Once the setup page opens:
- Create an administrator password if requested.
- Allow the extender to search for available Wi-Fi networks.
- Select your home Wi-Fi network.
- Enter your existing Wi-Fi password.
- Choose the extended network name if the setup page gives you that option.
- Save the settings and wait for the extender to restart.
Your extender should now connect to your router. You can connect your phone, laptop, or smart TV to the extended network.
If the setup page does not open, make sure your phone is connected to the extender’s setup Wi-Fi. Turn off mobile data temporarily if your phone keeps switching connections. You can also check the manufacturer’s app or instructions.
For more background on wireless access point protection, see our guide to access point cybersecurity.
Where to Move Your Extender After Setup
After completing setup, unplug the extender and move it to a better location.
The best starting point is roughly halfway between your router and the area with weak Wi-Fi. This allows the extender to receive a usable signal before sending it farther.
For example, if your router is in the living room and your bedroom has poor coverage, place the extender in a hallway between the two rooms.
Avoid placing it inside the dead zone. If the extender receives a weak signal from the router, it may repeat that weak connection.
Keep it away from thick walls, metal cabinets, microwaves, and other objects that can interfere with wireless signals. Place it in an open area where possible.
After plugging it in, check the signal indicator on the extender. Many models use green or blue lights for a good connection and orange or red lights for a weak one. Check your manual because light meanings vary.
You can also run a speed test in the room where Wi-Fi was previously weak. If the connection is still slow, move the extender slightly closer to the router.
Security Tip: Protect Your Extended Wi-Fi Network
Setting up your extender is only part of the job. You also need to secure it.
Some extenders come with default administrator login details. Leaving these unchanged can make it easier for someone to access the device settings.
Take these precautions:
- Change the default admin password: Create a long, unique password that is different from your Wi-Fi password.
- Use WPA2 or WPA3 encryption: Choose WPA3 when your devices support it. WPA2-AES is a suitable option for older devices.
- Update the firmware: Check the manufacturer’s website or app for available security updates.
- Disable WPS when not needed: This reduces the number of ways someone can attempt to join your network.
- Check connected devices: Review your router or extender’s device list for unfamiliar connections.
Our guide to securing your Wi-Fi network explains more ways to protect your home connection.
The Bottom Line
Learning how to set up Wi-Fi extender devices does not require advanced networking skills. You can use WPS for quick pairing or a browser for manual setup.
Start by connecting the extender near your router. Once setup is complete, move it halfway toward the area with weak coverage. Finally, change its default administrator password and use strong Wi-Fi encryption.
A few simple steps can help improve wireless coverage while keeping your home network safer.
Frequently Asked Questions
1. Can I connect any Wi-Fi extender to any router?
Many Wi-Fi extenders work with routers from different brands. However, compatibility depends on the wireless standards and features supported by both devices. Check the product specifications before buying.
2. Why is my Wi-Fi extender not connecting?
Common causes include an incorrect Wi-Fi password, weak router signal, incompatible settings, or a failed setup process. Move the extender closer to the router and try again. You may also need to reset it and repeat the setup.
3. Does a Wi-Fi extender make internet faster?
No. An extender mainly improves coverage. It does not increase the internet speed supplied by your provider. In some setups, repeating a wireless connection can also reduce available speed.
4. Should my extender have the same Wi-Fi name as my router?
Some extenders allow you to use the same network name and password. Others add a suffix such as _EXT. The same name can make switching between access points easier, but your device decides when to move between them.




COPE Cyber Security: What Is Corporate-Owned Personally-Enabled?
COPE in cyber security stands for Corporate-Owned, Personally-Enabled. It is a mobile...
 Zahra_Alialiali6 Mins read

How to Check for Hidden Cameras in Your Airbnb (7 Easy Methods)
How to Check for Hidden Cameras in Your Airbnb (7 Easy Methods)...
Beatriz5 Mins read

Ransomware Recovery Plan: Complete Guide
Ransomware can disrupt business operations, encrypt important files, and prevent employees from...
Zahra_Alialiali6 Mins read

Microsoft Outage: What It Means for Businesses and Institutions
Imagine arriving at work, opening your computer, and discovering that you cannot...
Beatriz4 Mins read




Leave a comment